Office chairs are a staple in workplaces and home offices alike. Over time, these chairs may require maintenance or repairs, and one essential skill to have in your DIY toolkit is knowing how to disassemble an office chair. Whether you're looking to replace a broken part, clean the chair thoroughly, or transport it easily, knowing how to take it apart can be immensely helpful.
In this comprehensive guide, we will walk you through the process of disassembling an office chair step by step. Whether you're a seasoned DIY enthusiast or a beginner looking to learn some new skills, this guide will provide you with the knowledge and confidence you need to tackle this task effectively.
Why Disassemble an Office Chair?
Before diving into the disassembly process, it's crucial to understand why you might need to take your office chair apart. Here are some common reasons:
- Repairs: Parts of your chair, such as the gas lift or wheels, may need replacing due to wear and tear.
- Cleaning: Deep cleaning your office chair is easier when it's disassembled. Removing accumulated dust and debris can extend its lifespan.
- Transportation: If you're moving or need to transport the chair, disassembling it makes it more manageable and less prone to damage.
- Customization: Disassembly allows you to customize your chair by painting or replacing certain components.
In the next sections, we'll guide you through the disassembly process, keeping safety in mind.
Safety Precautions
Safety should always be your top priority when working with tools and disassembling furniture. Here are some essential safety precautions to follow:
- Wear Appropriate Gear: Use safety goggles to protect your eyes from debris, and wear gloves to prevent cuts and scrapes.
- Clear Work Area: Ensure your workspace is well-lit and free of obstacles to prevent tripping or accidents.
- Read the Manual: Consult your chair's user manual if available. It may contain specific instructions or warnings related to disassembly.
- Disconnect Power: If your office chair has electrical components (such as heated seats), unplug it from the power source before starting.
- Use the Right Tools: Make sure you have the necessary tools and that they are in good working condition.
Now that we've covered safety, let's discuss the tools you'll need.
Tools Required
Gathering the right tools is crucial for a smooth disassembly process. Here's a list of tools you'll likely need:
- Screwdriver: A Phillips-head or flat-head screwdriver, depending on the types of screws used in your chair.
- Adjustable Wrench: Useful for loosening and tightening nuts and bolts.
- Allen Wrench (Hex Key): Often included with office chairs, this tool is used for hexagonal screws and bolts.
- Pliers: Helpful for gripping and turning small parts.
- Rubber Mallet: Used to gently tap and loosen stubborn or stuck components.
- Ziplock Bags or Containers: Use these to organize and store small parts, screws, and bolts.
With your tools ready, let's dive into the step-by-step guide for disassembling your office chair.
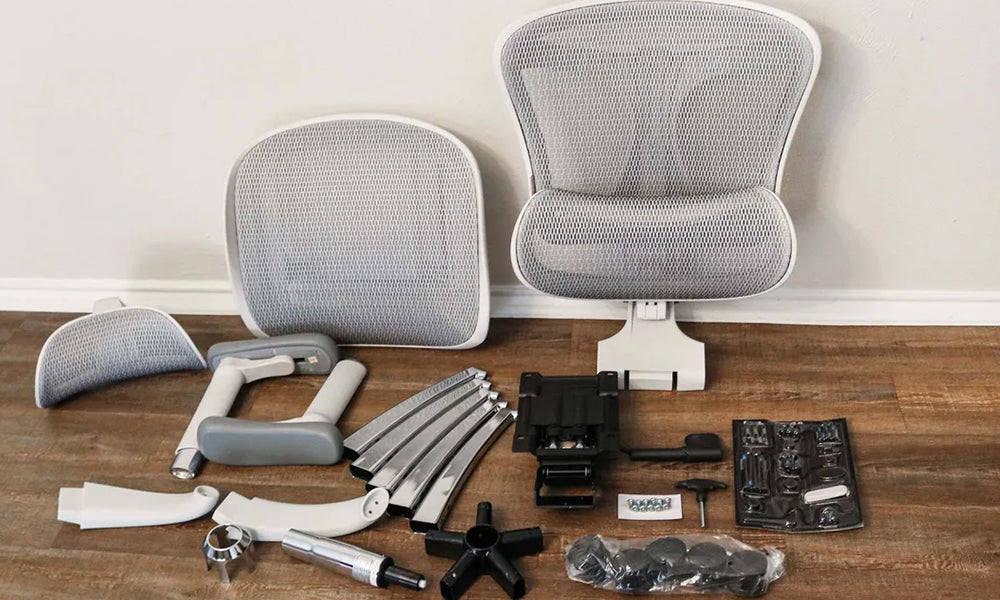
Step-by-Step Guide to Disassembling an Office Chair
In this section, we will provide a detailed guide to disassembling an office chair, broken down into four main steps:
a. Removing the Seat Cushion
Begin by flipping the chair upside down, ensuring it's stable.
Locate the screws or bolts securing the seat cushion to the chair base.
Using the appropriate tool (screwdriver or Allen wrench), carefully remove these fasteners.
Lift the seat cushion off the chair base and set it aside.
b. Detaching the Backrest
Stand the chair upright and turn your attention to the backrest.
Look for screws or bolts that connect the backrest to the chair's frame.
Remove these screws or bolts using the appropriate tool.
Carefully lift the backrest off the frame, ensuring you don't damage the recline mechanism.
c. Taking Apart the Armrests
Examine the armrests to identify how they are attached to the chair. This can vary by chair model.
If the armrests are secured with screws, use the appropriate tool to remove them.
For armrests connected with other mechanisms, consult your chair's manual for guidance on removal.
d. Disassembling the Base and Gas Lift
Flip the chair upside down again to access the base and gas lift.
Look for the fasteners that attach the chair's base to the gas lift mechanism.
Carefully remove these fasteners, and the base should come off easily.
Next, focus on the gas lift cylinder. Locate the retaining clip or ring that secures it to the chair.
Use pliers to remove the retaining clip or ring. Be cautious as the gas lift may release pressure when you do this.
Once the gas lift is free, you can separate it from the chair's mechanism.
By following these steps, you will have successfully disassembled your office chair. Now, let's move on to cleaning and maintenance.
Cleaning and Maintenance
With your chair disassembled, cleaning and maintenance become much more accessible. Here's what you can do:
- Cleaning: Thoroughly clean each component, including the seat cushion, backrest, armrests, and base. Use a mild detergent or upholstery cleaner for fabric parts, and a suitable cleaner for any metal or plastic components. Pay special attention to crevices and joints where dust and debris tend to accumulate.
- Inspect for Damage: While cleaning, inspect each part for signs of wear or damage. Replace any damaged or worn components as needed.
- Lubrication: If your chair has moving parts like recline mechanisms, apply lubricant to ensure smooth operation.
- Reupholstering: If the fabric on your seat or backrest is worn or stained beyond repair, consider reupholstering it.
Reassembling the Office Chair
Once you've completed the necessary cleaning and maintenance, it's time to put your office chair back together. Follow these general steps in reverse order:
- Secure the Base: Using the appropriate tool, reattach the fasteners that secure the base to the gas lift. Make sure they are tightened securely.
- Reattach the Armrests: If you removed the armrests, follow the instructions in your chair's manual to reattach them properly. If they were secured with screws, use your tools to fasten them securely.
- Attach the Backrest: Carefully position the backrest onto the chair's frame, aligning the holes for screws or bolts. Use the appropriate tool to secure it in place.
- Replace the Seat Cushion: Finally, place the seat cushion back onto the chair base and reattach it using the screws or bolts.
- Test the Chair: Before calling it a day, sit in your office chair and test all its functions, such as swiveling, reclining, and height adjustment. Ensure that everything is working smoothly and that there are no loose parts.
Congratulations, you've successfully reassembled your office chair! With regular maintenance and care, your chair should provide you with comfortable seating for years to come.
Troubleshooting Common Issues
Even with proper maintenance, office chairs can develop issues over time. Here are some common problems and how to address them:
- Squeaky Joints: If you notice squeaking sounds when you move in your chair, it may be due to friction in the joints. Apply a silicone-based lubricant to the affected areas.
- Uneven Seating: If your chair leans to one side or wobbles, check the base and make sure all the components are securely attached. If the issue persists, inspect the casters and replace any damaged ones.
- Hydraulic Lift Not Working: If your chair no longer adjusts in height, the gas lift may be the culprit. You may need to replace it with a new one.
- Torn Upholstery: Over time, the upholstery may tear or wear out. Consider reupholstering the chair or using a seat cover to hide the damage.
- Loose Armrests: If your armrests become loose, check the fasteners and tighten them as needed.
If you encounter more complex issues, consult your chair's manual or seek the help of a professional.
Conclusion
Disassembling and reassembling an office chair may seem like a daunting task, but with the right tools, safety precautions, and our step-by-step guide, you can confidently tackle this DIY project. Knowing how to disassemble and maintain your office chair can extend its lifespan, save you money on repairs, and ensure you have a comfortable and functional workspace.
Remember that regular cleaning and maintenance are key to keeping your office chair in excellent condition. By addressing issues promptly and following proper care procedures, you can enjoy a supportive and comfortable seating experience for years to come. So, roll up your sleeves, gather your tools, and give your office chair the attention it deserves. Your back and productivity will thank you for it.